How to Removal Center Gear Shift on 2007 Ford Expedition UPDATED
How to Removal Center Gear Shift on 2007 Ford Expedition
George likes to do his own maintenance on his vans and trucks. Occasionally, he makes stuff out of wood.
A Wobbly Tire Means You Demand a New Bicycle Bearing
So you're driving downwardly the route and notice in your side view mirror that your tire is wobbling like crazy. You hear a humming dissonance when taking turns. What this means is your cycle begetting is aptitude or off, which can happen after hundreds of thousands of miles. There are some small things that folks do to reduce the issue, but the wobble will continue until you get a new bike bearing.
People recommended that both wheel bearings on either the front or back be replaced at the aforementioned time, so if that matters, be prepared to vanquish out greenbacks for two bearings instead of one. Some people don't care and that'due south fine as well.
The proficient news is most wheel bearings tin be bought fully assembled these days. I know working on vans in the past you lot would have to take the bearings to a mechanic, and they would use their 10-ton press to push the bearing together and it was a real pain. Instead, make sure you purchase a fully assembled bearing and that it has any ABS sensors attached. Make certain the replacement is in fact the part y'all need, which we won't cover in full detail, only note that 4 wheel drive will accept one sensor on each cycle, and 2-wheel volition non. Permit'southward proceed.

Safety First
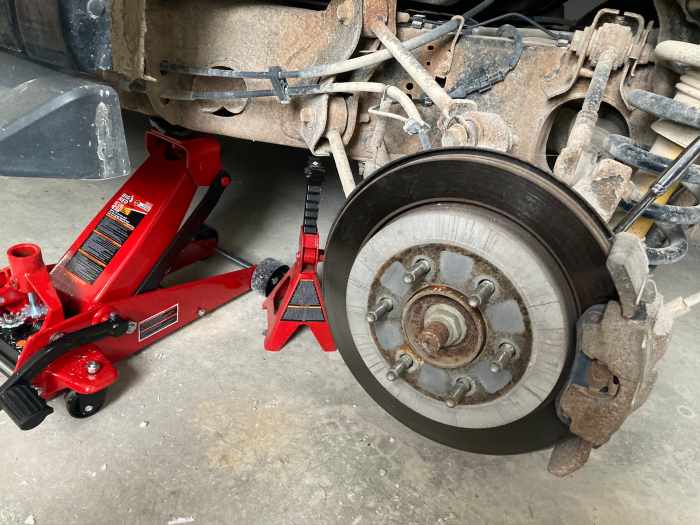
Make sure y'all take a jack and jack stand underneath the carriage, and so that if the vehicle moves as you push button and pull, it volition be safe and secure. Since we're doing this ourselves, recommend wheel stops on the fronts and back tires that are not beingness working on, and brand sure you're operating in a warm expanse like a heated garage. Outdoors is okay if the temperatures warrant it.
What You Will Work Towards
I come across folks disassembling every last part of a bike to get to the bearing, which is unnecessary. And so unless you wish to drop this thing off and get information technology re-aligned afterwards (which is still a expert idea), it'southward best to merely work towards the wheel hub assembly and nothing else. That means removing (a) the ii bolts for the caliper and (b) the 4 bolts for the bicycle assembly, nil else.
You'll annotation we'll too remove the axle bolt. I just so happened to accept a bound autumn off when working on it, which is not typical, so I will supervene upon that too. The spring holds the brake line to the vehicle.
What You'll Demand
- Cheater bar (metal pipage of some sort)
- Breaker bar (aye, in addition to cheater bar)
- Rust removal spray (whatever kin-
- Restriction cleaner (lots)
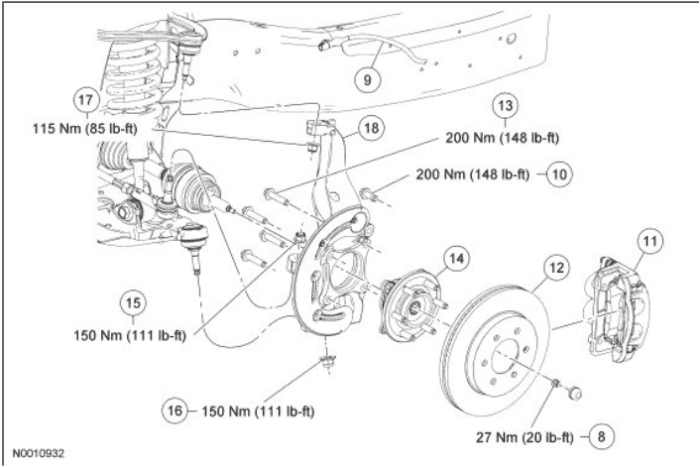
- A reference for the amount of tightening in human foot-lb (shown for appx vehicle)
- Socket big enough to remove the axle bolt. For my 2008 vehicle, this meant 32 mm.
- C clench
- Sledge hammer
- Sockets for the rear bolts (18 mm, both long and short)
- Torque wrench (to tighten back to spec)
- Curt bungie cord
- Auto bolts, roughly half-inch with nut
- Needle-nose pliers
- Lite stick
- Reciprocating saw (or anything that can cutting metallic bolts)
- Air tools if you have them, but not needed.
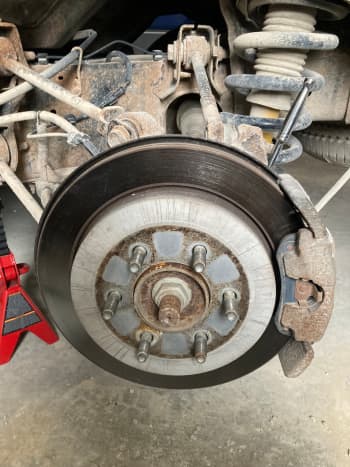
Remove the caliper bolts
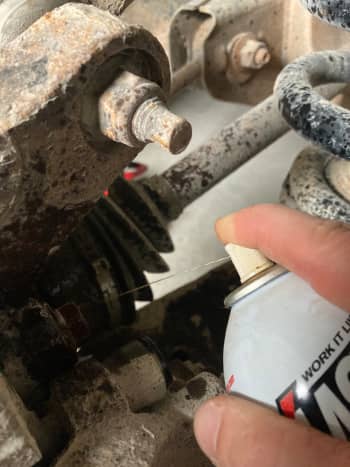
Don't fully dis-get together the caliper, instead just remove the 2 bolts holding it on from the back like so. If yous suspect you'll take issues, spray them down with cleaner and rust removal first, let it sit for 10 minutes or and so. The cheater bar is a aptitude slice of flake metal pipage and terminate hammered downward to fit well-nigh tool handles. In this case I bend it just slightly to motility the bolt down using a shortened xviii mm socket, which came off hands this style. Work smarter, not harder.
Pull Off the Caliper
Use a short or set of short bungie cords to hang the caliper away from the wheel, out of the way so it doesn't pull from the restriction fluid connection. Although I got a car wash prior to this projection, you'll need to apply brake cleaner on virtually of the parts as you go along.

Remove the Axle Bolt
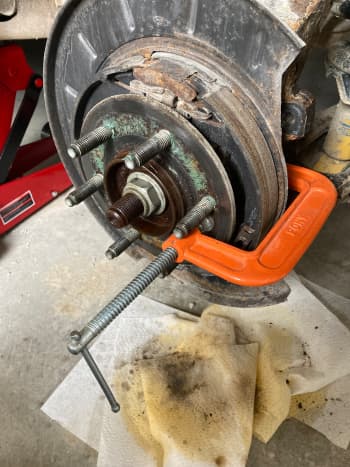
With the caliper out of the way, place a C clamp in its identify making certain the knuckle is supported from behind and the bike hub is locked to not rotate. If information technology's not moving, spray it with rust remover and let information technology sit. Fortunately, I had sprayed this function beforehand and my billow bar had no bug pulling it off. Each vehicle will have its own outcome, simply keep in listen all other parts on this matter will be re-used, then effort to keep everything in meridian shape.
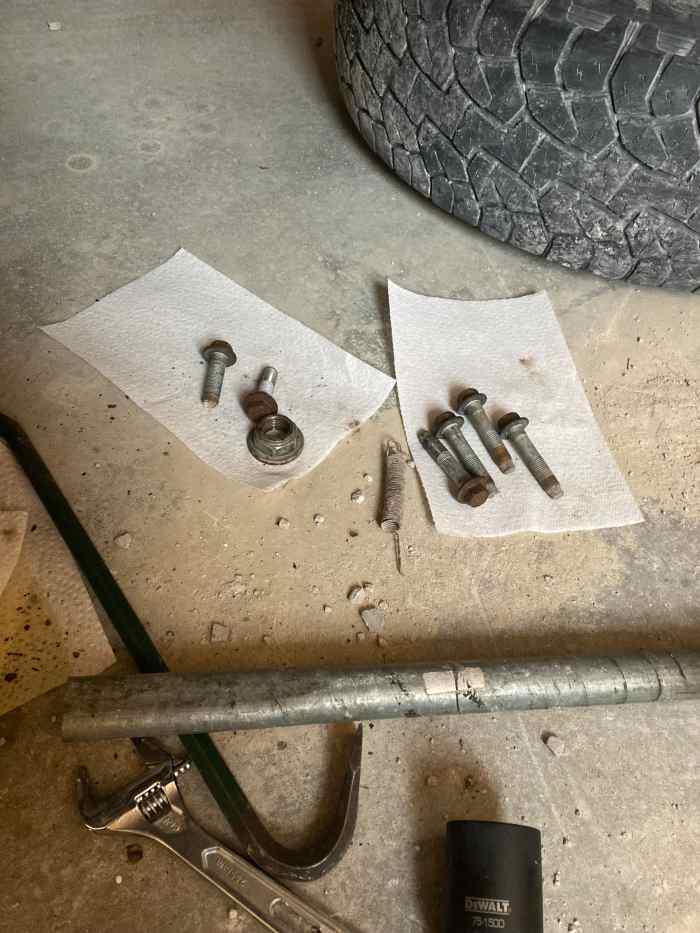
Remove the Hub Associates Bearing Bolts
In the same fashion that the caliper bolts were removed, piece of work towards the back and begin to remove the bolts holding on the bike bearing. This is a flake of a tight spot and I one time once again institute myself using my smaller socket wrench with the cheater bar just to get the commodities to move a bit, then unwind it the rest of the way each time.
The bike axle will exist surrounded past a protective shroud, which might brand it difficult pulling out the bolts. However, once all bolts are loose and released at the same fourth dimension, it should be simple to jerk them out one by one. In other words, don't fret the tight space until all 4 bolts are unscrewed.
Read More than from AxleAddict

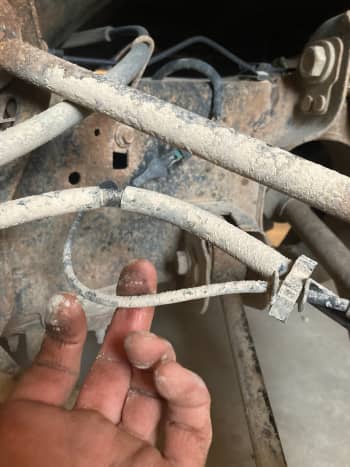
Remove the ABS Sensor
A lot of folks volition cutting these off, but the fact of the thing is yous'll need to reconnect another ane, so you might likewise reverse connect information technology, and then that you'll know what to exercise later. Exist warned that plastic connectors are Ford'due south downfall and tin hands be broken. It'due south best to have your time with removing the clips and avert using nix ties subsequently. In my experience the release clips are very frail and breakable, so use your hands to loosen up the connexion at the base. This is a practiced place to take your time.
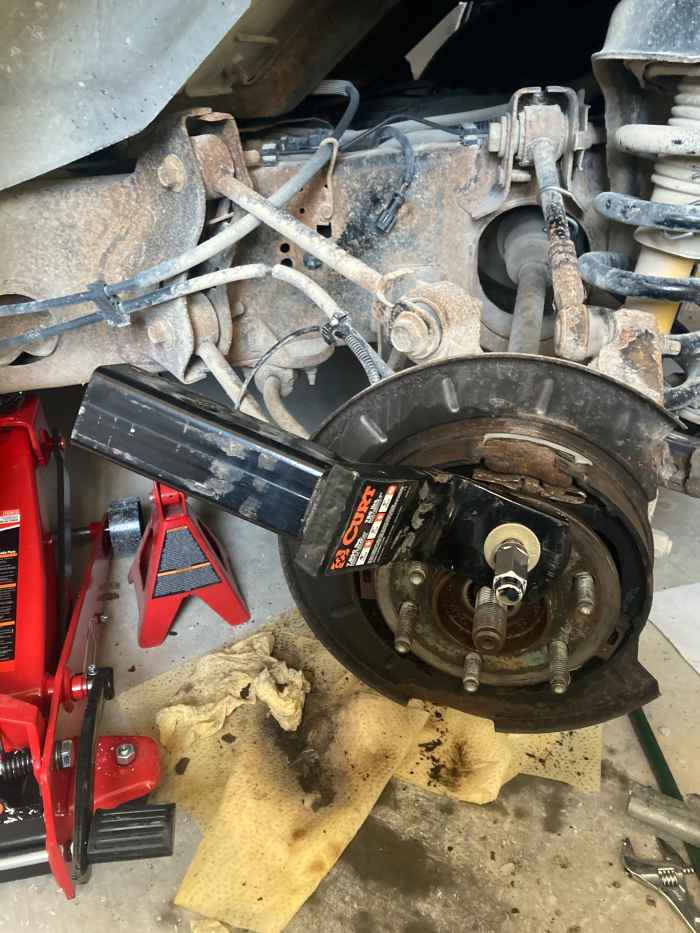
Removing the Wheel Hub Assembly
From this signal on, there are several techniques and methods in which to remove the wheel assembly. I started with a sledge hammer to get the centre axle loose, past hammering the lug bolts. One time that was moving, I sprayed the wheel hub with lots and lots of rust removal. Beyond this point, there are resource and tips on how to practise this, but the adjacent role is very challenging.
Delight know this is the betoken of no return. If your wheel hub is non budging after trying some of these techniques, it may be all-time to re-get together information technology and take information technology to your local mechanic. Notwithstanding, if you lot did decide to remove it yourself, let'due south do our all-time to keep everything else in tip superlative shape.

Tried This, Didn't Work. Fourth dimension to Get to the Store...
One method is to use an one-time nut with annihilation metal (in this instance I plant a hitch) and hammer it from behind. I tried this, did some rotating. I don't like to put also much force behind it, so rail if whatever progress is existence made, just exist sure to stop before damaging any of the knuckle.
Find Some Automobile Bolts
I went to a local hardware store and picked up some machine bolts. These are going to be threaded all the way and will probably pause easy, and so be sure to have several in supply. I chose one-half-inch bolts, which were the largest I could squeeze into the holes.
I proceeded to remove two of the vi hub bolts by cut them off and pulling the remains from beneath with a prepare of needle-olfactory organ pliers. There are some specialized tools that might have made the job much easier.

Ratchet Out the Wheel Bearing
It took me 3 tries to notice a place where the commodities was lodged confronting the knuckle from behind. It wasn't very articulate, so I had to put the motorcar in neutral (with bike stops in place) earlier rotating the holes around.
Typically, you would put in a bolt from each side, only once I made contact with the knuckle it seemed to come out just fine at that bespeak. It might have been some of the activities I did earlier that loosened it up for me. For a vehicle with over 180,000 miles, it'southward certainly going to be a pain. This method seemed to work merely fine for me. Fortunately, no expensive equipment was required, only I sure would accept rather had better tools lying effectually.
Make clean the Internal Parts
Spray downwards the axle and within knuckle with rust removal and restriction cleaner, requite it some fourth dimension to soak. Wipe it down well plenty then that we tin can add grease subsequently on.
Cheque the New Parts
Compare the new parts with the old and make sure everything lines up, including the connector for the ABS sensor. A few minutes will get a long manner.
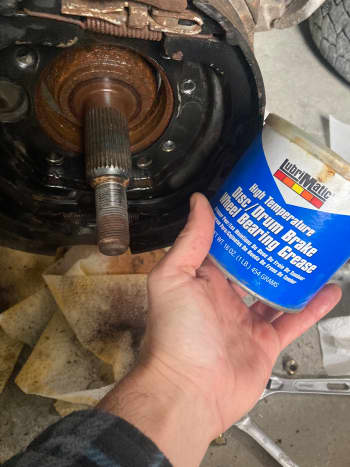
Add Grease to Everything
Continue in greasing everything around the beam and inside the bike hub. Too piffling or likewise much volition cause bug, then grease things upward accordingly. Go along in tightening dorsum the bolts in place, lining upward the wheel hub. I had to smoothen a lite to brand sure the hub was in alignment with the impressions fabricated from the last one, earlier using my hand to spiral the bolts in from behind.
I always tighten in a star formation; this brings all sides of a rounded part together uniformly. If you are not sure what that means, information technology'southward basically where you tighten each lug nut on a tire by going to the furthest one from the last one. Do the same from backside when connecting the wheel hub bolts, go vertically to the opposite side of the first bolt, then place the second and so on. Tighten according to the specs.
Supersede Parts in Reverse Guild
After tightening the bolts backside the wheel hub, be sure to reconnect the ABS sensor making sure it'south following the same line as the previous. I likewise replaced the spring that held my brake line on, which was merely hanging below when I offset took off the wheel. It's a good time to inspect other things and brand sure everything is in order.
I also filled in the holes from the backside that went through the shield when I was using the machine bolts with some waterproofing caulk. I used my needle-nose pliers to reshape those holes, but thought I'd add something actress in instance water splashes around underneath... wouldn't want that to get into the wheel hub area later on. Very precautionary and frankly not much of an event, to be honest.

Finishing Touches
First re-tighten the axle bolt on to spec. Place the rotor on and exit it in that location.
Re-attach the brake caliper with the two bolts. I did take to put a crowbar into the caliper to pry dorsum the restriction a bit, to get it back onto the rotor. Proceed by tightening the two bolts and nosotros're finished.
Clean up the area and wiped down the rotor and brakes ane concluding time.
At this point the project is washed.
When I finished, the ABS sensor turned on inside the vehicle. After test driving the vehicle for a couple miles the low-cal turned off. This is expert and is a articulate indicator the work is complete with no issues. If you continue to have a code you can run the lawmaking at your local parts store. They can remove or give you any error codes that may notwithstanding exist present.
Best wishes to yous and I'll encounter yous out on the road!
DOWNLOAD HERE
How to Removal Center Gear Shift on 2007 Ford Expedition UPDATED
Posted by: lenoremanothaver.blogspot.com

Comments
Post a Comment